For numerous vital application functions, consisting of streaming and e-commerce, monolithic architecture is no longer enough. With present needs for real-time occasion information and cloud service use, numerous contemporary applications, such as Netflix and Lyft, have actually moved to an event-driven microservices technique. Separated microservices can run individually of one another and boost a code base’s versatility and scalability.
However what is an event-driven microservices architecture, and why should you utilize it? We’ll take a look at the fundamental elements and develop a total plan for an event-driven microservices job utilizing Python and Apache Kafka
Utilizing Event-driven Microservices
Event-driven microservices integrate 2 contemporary architecture patterns: microservices architectures and event-driven architectures. Though microservices can couple with request-driven REST architectures, event-driven architectures are ending up being progressively appropriate with the increase of huge information and cloud platform environments.
What Is a Microservices Architecture?
A microservices architecture is a software application advancement method that arranges an application’s procedures as loosely combined services. It is a kind of service-oriented architecture (SOA)
In a conventional monolithic structure, all application procedures are naturally adjoined; if one part stops working, the system decreases. Microservices architectures rather group application processes into different services communicating with light-weight procedures, offering enhanced modularity and much better app maintainability and resiliency.

Though monolithic applications might be easier to establish, debug, test, and release, the majority of enterprise-level applications rely on microservices as their requirement, which enables designers to own parts individually. Effective microservices must be kept as basic as possible and interact utilizing messages (occasions) that are produced and sent out to an occasion stream or taken in from an occasion stream. JSON, Apache Avro, and Google Procedure Buffers prevail options for information serialization.
What Is an Event-driven Architecture?
An event-driven architecture is a style pattern that structures software application so that occasions drive the habits of an application. Occasions are significant information produced by stars ( i.e., human users, external applications, or other services).
Our example job functions this architecture; at its core is an event-streaming platform that handles interaction in 2 methods:
- Getting messages from stars that compose them (typically called publishers or manufacturers)
- Sending out messages to other stars that read them (typically called customers or customers)
In more technical terms, our event-streaming platform is software application that serves as the interaction layer in between services and enables them to exchange messages. It can carry out a range of messaging patterns, such as publish/subscribe or point-to-point messaging, in addition to message lines

Utilizing an event-driven architecture with an event-streaming platform and microservices uses a wealth of advantages:
- Asynchronous interactions: The capability to individually multitask enables services to respond to occasions whenever they are all set rather of waiting on a previous job to end up prior to beginning the next one. Asynchronous interactions assist in real-time information processing and make applications more reactive and maintainable.
- Total decoupling and versatility: The separation of manufacturer and customer parts suggests that services just require to connect with the event-streaming platform and the information format they can produce or take in. Solutions can follow the single duty concept and scale individually. They can even be executed by different advancement groups utilizing special innovation stacks.
- Dependability and scalability: The asynchronous, decoupled nature of event-driven architectures even more magnifies app dependability and scalability (which are currently benefits of microservices architecture style).
With event-driven architectures, it’s simple to develop services that respond to any system occasion. You can likewise develop semi-automatic pipelines that consist of some manual actions. (For instance, a pipeline for automated user payments may consist of a manual security check set off by abnormally big payment worths prior to moving funds.)
Picking the Task Tech Stack
We will develop our job utilizing Python and Apache Kafka coupled with Confluent Cloud. Python is a robust, dependable requirement for numerous kinds of software application tasks; it boasts a big neighborhood and abundant libraries. It is a great option for developing microservices due to the fact that its structures are fit to REST and event-driven applications (e.g., Flask and Django). Microservices composed in Python are likewise frequently utilized with Apache Kafka.
Apache Kafka is a widely known event-streaming platform that utilizes a publish/subscribe messaging pattern. It is a typical option for event-driven architectures due to its comprehensive community, scalability (the outcome of its fault-tolerance capabilities), storage system, and stream processing capabilities.
Finally, we will utilize Confluent as our cloud platform to effectively handle Kafka and offer out-of-the-box facilities. AWS MSK is another exceptional choice if you’re utilizing AWS facilities, however Confluent is simpler to establish as Kafka is the core part of its system and it uses a complimentary tier.
Carrying Out the Task Plan
We’ll establish our Kafka microservices example in Confluent Cloud, develop an easy message manufacturer, then arrange and enhance it to enhance scalability. By the end of this tutorial, we will have a working message manufacturer that effectively sends out information to our cloud cluster.
Kafka Setup
We’ll initially develop a Kafka cluster. Kafka clusters host Kafka servers that assist in interaction. Manufacturers and customers user interface with the servers utilizing Kafka subjects (classifications keeping records).
- Register For Confluent Cloud As soon as you develop an account, the welcome page appears with choices for developing a brand-new Kafka cluster. Select the Fundamental setup.
- Select a cloud company and area. You must enhance your options for the very best cloud ping arises from your place. One choice is to pick AWS and carry out a cloud ping test (click HTTP Ping) to determine the very best area. (For the scope of our tutorial, we will leave the “Single zone” choice picked in the “Accessibility” field.)
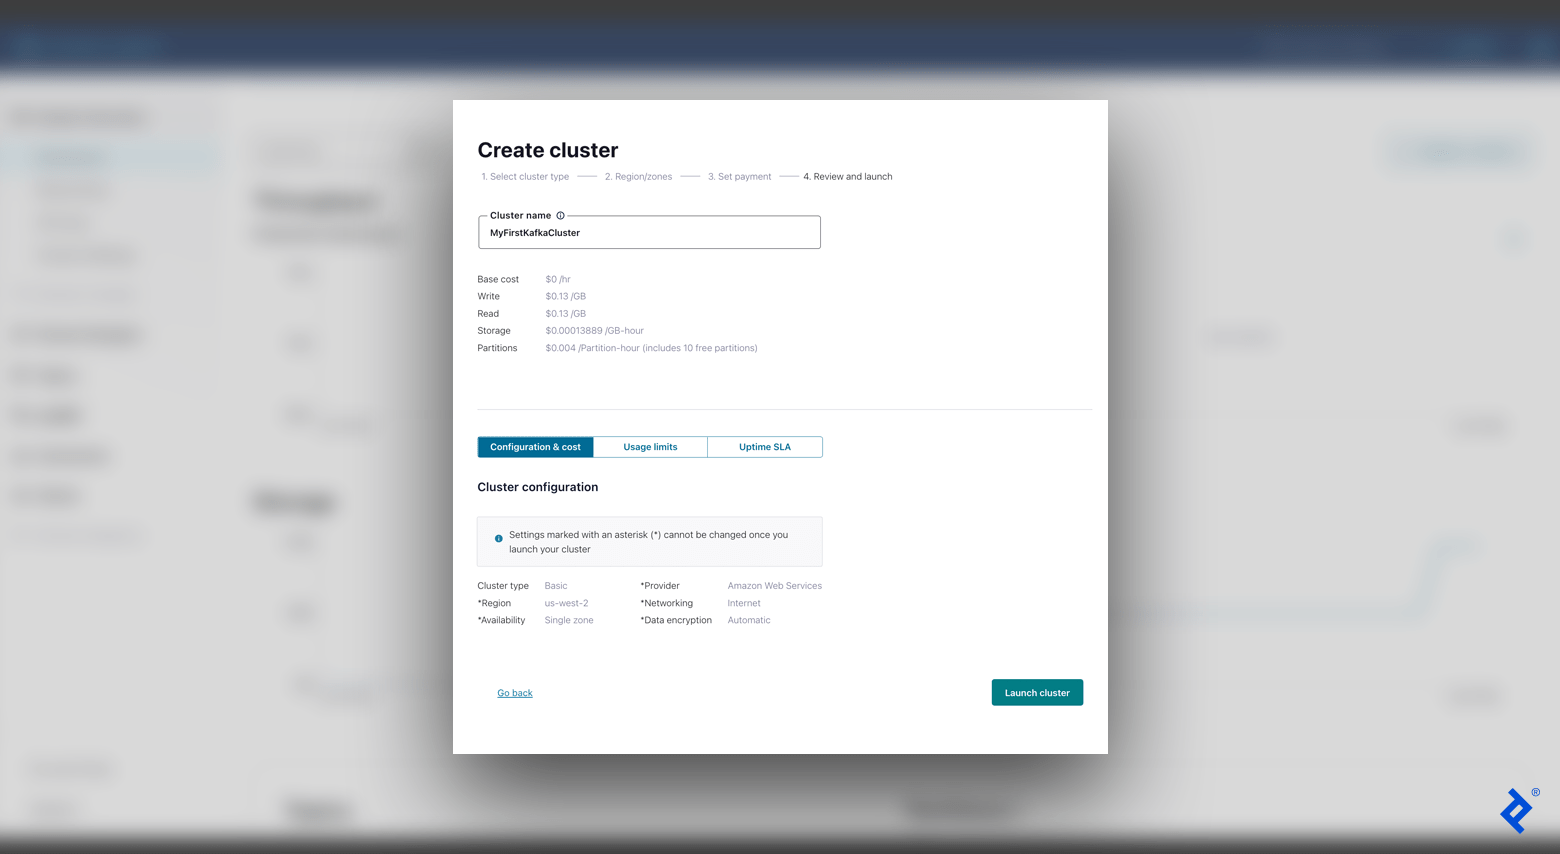
- The next screen requests a payment setup, which we can avoid considering that we are on a complimentary tier. After that, we will enter our cluster name (e.g., “MyFirstKafkaCluster”), validate our settings, and choose Introduce cluster
With a working cluster, we are all set to develop our very first subject. In the left-hand menu bar, browse to Subjects and click Produce subject Include a subject name (e.g., “MyFirstKafkaTopic”) and continue with the default setups (consisting of setting 6 partitions).
Prior to developing our very first message, we need to establish our customer. We can quickly Set up a customer from our recently produced subject summary (additionally, in the left-hand menu bar, browse to Customers). We’ll utilize Python as our language and after that click Produce Kafka cluster API secret

At this moment, our event-streaming platform is lastly all set to get messages from our manufacturer.
Basic Message Manufacturer
Our manufacturer creates occasions and sends them to Kafka. Let’s compose some code to develop an easy message manufacturer. I advise establishing a virtual environment for our job considering that we will be setting up several bundles in our environment.
Initially, we will include our environment variables from the API setup from Confluent Cloud. To do this in our virtual environment, we’ll include export SETTING= worth for each setting listed below to the end of our trigger file (additionally, you can include SETTING= worth to your.env file):
 export KAFKA_BOOTSTRAP_SERVERS=<< bootstrap.servers>>.
export KAFKA_SECURITY_PROTOCOL=<< security.protocol>>.
export KAFKA_SASL_MECHANISMS=<< sasl.mechanisms>>.
export KAFKA_SASL_USERNAME=<< sasl.username>>.
export KAFKA_SASL_PASSWORD=<< sasl.password>>.
Make certain to change each entry with your Confluent Cloud worths (for instance, << sasl.mechanisms>> must be PLAIN), with your API secret and trick as the username and password. Run source env/bin/activate, then printenv Our brand-new settings must appear, validating that our variables have actually been properly upgraded.
We will be utilizing 2 Python bundles:
We’ll run the command pip set up confluent-kafka python-dotenv to set up these. There are numerous other bundles for Kafka in Python that might work as you broaden your job.
Lastly, we’ll develop our standard manufacturer utilizing our Kafka settings. Include a simple_producer. py file:
 # simple_producer. py.
import os.

from confluent_kafka import KafkaException, Manufacturer.
from dotenv import load_dotenv.

def primary():.
settings = {
' bootstrap.servers': os.getenv(' KAFKA_BOOTSTRAP_SERVERS'),.
' security.protocol': os.getenv(' KAFKA_SECURITY_PROTOCOL'),.
' sasl.mechanisms': os.getenv(' KAFKA_SASL_MECHANISMS'),.
' sasl.username': os.getenv(' KAFKA_SASL_USERNAME'),.
' sasl.password': os.getenv(' KAFKA_SASL_PASSWORD'),.
}

manufacturer = Manufacturer( settings).
producer.produce(.
subject=' MyFirstKafkaTopic',
secret= None,.
worth=' MyFirstValue-111',
).
producer.flush() # Wait on the verification that the message was gotten.

if __ name __ == '__ primary __':.
load_dotenv().
primary().
With this uncomplicated code we develop our manufacturer and send it an easy test message. To evaluate the outcome, run python3 simple_producer. py:

Examining our Kafka cluster’s Cluster Introduction > > Control Panel, we will see a brand-new information point on our Production chart for the message sent out.
Customized Message Manufacturer
Our manufacturer is up and running. Let’s restructure our code to make our job more modular and OOP-friendly This will make it simpler to include services and scale our job in the future. We’ll divide our code into 4 files:
-
kafka_settings. py: Holds our Kafka setups. -
kafka_producer. py: Consists of a customizedproduce()approach and mistake handling. -
kafka_producer_message. py: Manages various input information types. -
advanced_producer. py: Runs our last app utilizing our custom-made classes.
Initially, our KafkaSettings class will encapsulate our Apache Kafka settings, so we can quickly access these from our other files without duplicating code:
 # kafka_settings. py.
import os.

class KafkaSettings:.
def __ init __( self):.
self.conf = {
' bootstrap.servers': os.getenv(' KAFKA_BOOTSTRAP_SERVERS'),.
' security.protocol': os.getenv(' KAFKA_SECURITY_PROTOCOL'),.
' sasl.mechanisms': os.getenv(' KAFKA_SASL_MECHANISMS'),.
' sasl.username': os.getenv(' KAFKA_SASL_USERNAME'),.
' sasl.password': os.getenv(' KAFKA_SASL_PASSWORD'),.
}
Next, our KafkaProducer enables us to tailor our produce() approach with assistance for numerous mistakes (e.g., a mistake when the message size is too big), and likewise instantly flushes messages as soon as produced:
 # kafka_producer. py.
from confluent_kafka import KafkaError, KafkaException, Manufacturer.

from kafka_producer_message import ProducerMessage.
from kafka_settings import KafkaSettings.

class KafkaProducer:.
def __ init __( self, settings: KafkaSettings):.
self. _ manufacturer = Manufacturer( settings.conf).

def fruit and vegetables( self, message: ProducerMessage):.
shot:.
self. _ producer.produce( message.topic, secret= message.key, worth= message.value).
self. _ producer.flush().
other than KafkaException as exc:.
if exc.args[0] code() == KafkaError.MSG _ SIZE_TOO_LARGE:.
pass # Deal with the mistake here.
else:.
raise exc.
In our example’s try-except block, we avoid over the message if it is too big for the Kafka cluster to take in. Nevertheless, you must upgrade your code in production to manage this mistake properly. Describe the confluent-kafka paperwork for a total list of mistake codes.
Now, our ProducerMessage class manages various kinds of input information and properly serializes them. We’ll include performance for dictionaries, Unicode strings, and byte strings:
 # kafka_producer_message. py.
import json.

class ProducerMessage:.
def __ init __( self, subject: str, worth, secret= None) -> > None:.
self.topic = f' {subject} '.
self.key = secret.
self.value = self.convert _ value_to_bytes( worth).

@classmethod.
def convert_value_to_bytes( cls, worth):.
if isinstance( worth, dict):.
return cls.from _ json( worth).

if isinstance( worth, str):.
return cls.from _ string( worth).

if isinstance( worth, bytes):.
return cls.from _ bytes( worth).

raise ValueError( f' Incorrect message worth type: {type( worth)} ').

@classmethod.
def from_json( cls, worth):.
return json.dumps( worth, indent= None, sort_keys= Real, default= str, ensure_ascii= False).

@classmethod.
def from_string( cls, worth):.
return value.encode(' utf-8').

@classmethod.
def from_bytes( cls, worth):.
return worth.
Lastly, we can construct our app utilizing our recently produced classes in advanced_producer. py:
 # advanced_producer. py.
from dotenv import load_dotenv.

from kafka_producer import KafkaProducer.
from kafka_producer_message import ProducerMessage.
from kafka_settings import KafkaSettings.

def primary():.
settings = KafkaSettings().
manufacturer = KafkaProducer( settings).
message = ProducerMessage(.
subject=' MyFirstKafkaTopic',
worth= {"worth": "MyFirstKafkaValue"},.
secret= None,.
).
producer.produce( message).

if __ name __ == '__ primary __':.
load_dotenv().
primary().
We now have a cool abstraction above the confluent-kafka library. Our custom-made manufacturer has the very same performance as our basic manufacturer with included scalability and versatility, all set to adjust to numerous requirements. We might even alter the underlying library completely if we wished to, which sets our job up for success and long-lasting maintainability.

After running python3 advanced_producer. py, we see yet once again that information has actually been sent out to our cluster in the Cluster Introduction > > Control Panel panel of Confluent Cloud. Having actually sent out one message with the basic manufacturer, and a 2nd with our custom-made manufacturer, we now see 2 spikes in production throughput and a boost in general storage utilized.
Looking Ahead: From Manufacturers to Customers
An event-driven microservices architecture will boost your job and enhance its scalability, versatility, dependability, and asynchronous interactions. This tutorial has actually provided you a peek of these advantages in action. With our enterprise-scale manufacturer up and running, sending out messages effectively to our Kafka broker, the next actions would be to develop a customer to check out these messages from other services and include Docker to our application.
The editorial group of the Toptal Engineering Blog site extends its appreciation to E. Deniz Toktay for examining the code samples and other technical material provided in this short article.
.